Multiple Docker Services on One VM with Nginx - Part 1
/ 12 min read
Updated:Table of Contents
Why are we doing this?
Small development teams often tend to make the most out of their limited resources, pushing their cloud machines to the limit and we at ScratchandScreen are no exception. We are proud to embrace this resourceful mindset. Currently we rely on a single GCE cloud machine which we would like to use to its fullest potential. This VM is dedicated to development purposes along with some testing of certain applications but nothing more.
Use Case
The objective is to host multiple services on a single GCE instance and utilize these services for our daily development tasks. An example of such a stack could include Jenkins for CI/CD, proprietary APIs that developers want to test, databases for testing/development purposes, a Jupyter server for compute or ML tasks, Postman/Jmeter to debug APIs etc.
All these services will be containerized, running in isolated Docker containers. The idea is to expose these services to the end user through a reverse proxy. Hence, these services will run behind an nginx reverse proxy which will handle routing requests to the appropriate service, making the setup efficient and seamless.
Additionally, these containers can be deployed as services using Docker Swarm, which will take care of service orchestration ensuring reliability and scalability. This combination of containers, reverse proxy, and a container orchestrator gives us the ability to make the most out of a single cloud machine while maintaining a streamlined development environment. Below is the list of complete tech stack we are using:
- Docker - for quick deployment of services
- Docker swarm - an easy to learn orchestrator for docker containers
- nginx - battle tested reverse proxy software for accessing hosted services through docker containers. We will be using a well maintained and cited repository nginx-proxy that will let us generate nginx configurations automatically.
- Portainer - software to manage docker resources including deploying containers, stacks, networks etc. It comes with a nice GUI and is loaded with features such as OAuth authentication.
- SSL certificates: we will use acme-companion that uses letsencrypt’s APIs to acquire SSL certificates for our hosted services. The repository is developed & maintained by the same team which maintains the nginx-proxy project. So the integration with nginx reverse proxy is seamless and minimal.
- ElasticSearch & Kibana: an EK stack consisting of elastic search and kibana which is pretty useful to monitor logs/metadata of various services.
How to do it?
Everything will be fueled by Docker, hence there are multiple Docker Compose files. Each of these can be deployed as a stack and registered as a service with Docker Swarm which is responsible for orchestration of registered services. Compose files give us the advantage of replicating and re-using the service stack on any Linux machine within a few commands. When combined with Makefiles deployment literally takes a couple of seconds, and the whole stack is up and running.
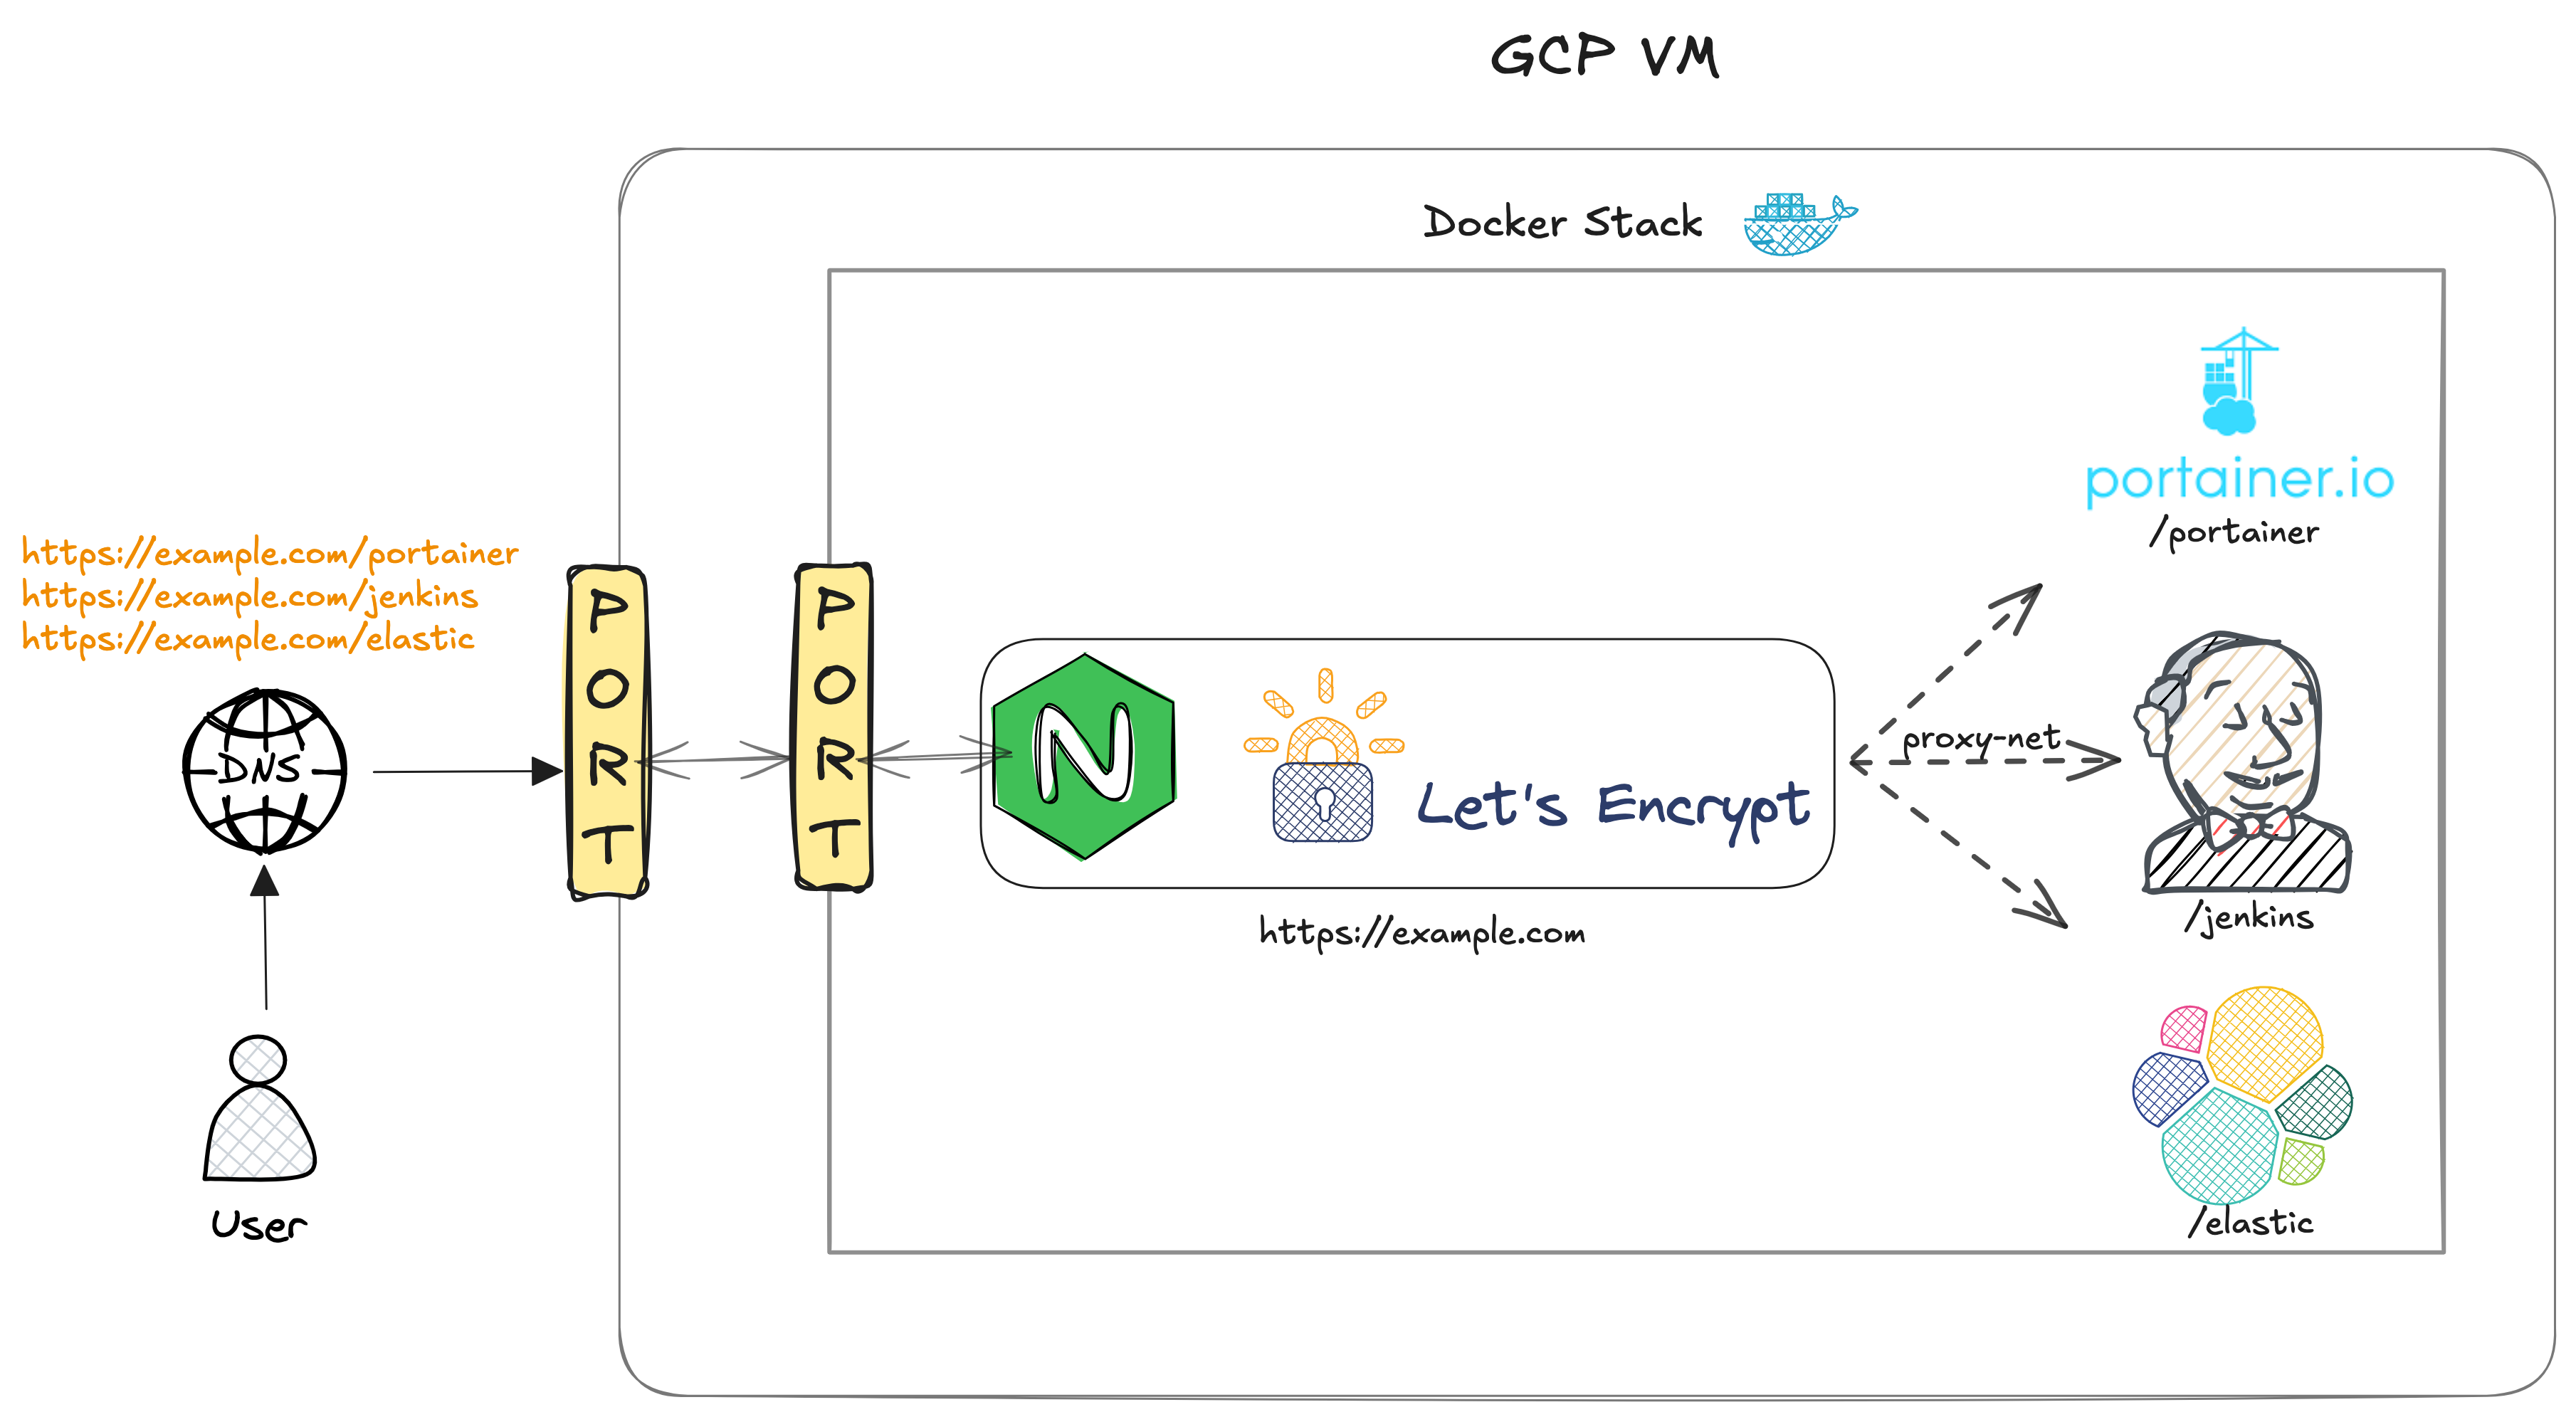
Roughly speaking, Nginx will act as a reverse proxy and all other services will be proxied through it. Visually, the stack can be represented as follows:
Now we will walk through our tech stack to have an idea of the nitty-gritty of each tool/software and any problems we might face during the installation.
Prerequisites
Linux machine
A Linux machine with Docker installed on it and access to the command line. The official docker tutorial for installation is adequate for getting Docker installed.
DNS Setup
A domain URL is also required. It will eventually become the base URL for all deployed services. Please note that it is better to have a domain name configured rather than using the IP address of the cloud instance. Some of the tools of our tech stack might complain about not having a valid domain name.
There is also an open source DNS service called Duck DNS. Although I haven’t used it but seems pretty cool to quickly have a valid configured domain name.
Docker Swarm Setup
TLDR; docker swarm init —advertise-addr <MANAGER-IP>
This setup has been deployed on a single Linux GCE VM which acts as a manager node. I haven’t tested the multiple VMs setup, in which multiple Linux machines can communicate amongst each other and a single node is manager while others are workers.
Anyway, also for Swarm the official tutorial is good enough to have it set up on a Linux machine which is basically a single command mentioned above.
Reverse Proxy
A reverse proxy sits between our applications/services and the outside internet traffic. It acts as a gatekeeper, routing incoming traffic to the appropriate applications based on domain names, paths, or predefined rules, all through a common gateway (i.e., a shared IP and port). In our tech stack all the deployed services run in containers on the same localhost and reverse proxy routes incoming traffic towards these containers. To simplify the setup, the reverse proxy will also run in a container, and all containers will communicate through a shared Docker network. In figure 1, this network is labeled as proxy-net.
By default, a Docker container running on a host machine is not accessible from the outside. It does not receive requests from the outside unless container ports are mapped to the host machine’s ports. In our setup this is done only for the container running the reverse proxy and all other containers will be accessible through the reverse proxy itself.
A few benefits of reverse proxy:
- Path based and sub domain based routing through a single IP & port.
- Centralized SSL certificate management (ex letsencrypt)
- Load balancing to distribute requests efficiently amongst containers
- Easier to configure HTTPS through reverse proxy for all the applications centrally rather than configuring individually for each application.
The battle-tested Nginx
Apache and Nginx are two of the most successful web serving software. I think both of these pieces of software offer the same performance under high load. Although nginx was specifically designed to handle a large number of concurrent requests and thus has an asynchronous architecture. This is precisely why I think that Nginx might be more resourceful than Apache. At the very least it has a low memory footprint. These are just my assumptions and would need further verification.
Having said that, the main reason for selecting nginx was its ability to automatically generate Nginx configuration files using docker gen. Docker exposes APIs to query metadata and docker gen is a tool that utilizes these APIs to generate config files for nginx. This blog from the creator of docker gen explains the complete idea. There is also a github project nginx-proxy, actively maintained and is fairly easy to do the bare minimum in order to have a fully functioning reverse proxy.
Let us see how we can use nginx-proxy in our current setup and any other problems which might arise.
nginx-proxy as deployed service
We will use Docker Compose files to deploy our application stack as a service. Docker swarm will take care of replicating the service and restarting it in case of failures. It is pretty straightforward to convert any docker command into a docker compose file. Having compose files gives us the ability to reproduce the service stack on any linux machine, essentially it is the lazy dev’s best friend.
version: '3.2'
services: ${NGINX_SERVICE_NAME}:   image: nginxproxy/nginx-proxy:1.6   volumes:     - /var/run/docker.sock:/tmp/docker.sock:ro     - vhost.d:/etc/nginx/vhost.d   ports:     - "${GCP_INTERNAL_IP_ADDR}:80:80"     - "${GCP_INTERNAL_IP_ADDR}:443:443"   labels:     com.github.nginx-proxy.nginx: "true"   networks:     - ${NGINX_NETWORK_NAME}   deploy:     mode: global     placement:       constraints: [ node.platform.os == linux ]
networks: ${NGINX_NETWORK_NAME}:   driver: overlay
volumes: vhost.d:It is pretty handy to keep a .env file in order to have a centralized control over variables used across compose files for different applications. For the above compose file there are three variables required which are elaborated as follows:
- $NGINX_SERVICE_NAME : instead of hardcoding the service name in the compose file, it could be beneficial to have it associated with an environment variable so that the deployed service can be started & stopped via bash/docker commands through terminal. I prefer to do this via makefiles which are also the lazy dev’s best friend,
- $GCP_INTERNAL_IP_ADDR: GCP VM’s internal IP address
- $NGINX_NETWORK_NAME: variable that points to a network name which will be eventually used for communication amongst containers, in figure 1 it is labeled as proxy-net
SSL Certificate
To enable HTTPS on a website, a certificate is required. These certificates can be issued by a certificate authority. A popular CA is Let’s Encrypt and they provide APIs and some handy tools like certbot to automate acquisition and renewal of certificates. The only requirement before proceeding onto integrating SSL certificates for our server is having a domain name which should point to a fixed IP address.
Well HTTPS in itself is a huge topic and I neither have the experience nor the expertise to discuss it. However the bare minimum a developer needs to know is that
- An SSL certificate prefixes the urls with that lock icon and the https keyword
- An SSL certificate (especially those issued by Lets’Encrypt) are short lived and must be renewed every 3 months or so.
- An SSL certificate can be issued for a single domain, multiple domains (SAN certificates) or a wildcard domain covering all subdomains.
Now since we are using a reverse proxy, it is natural to take advantage of subdomains and/or path based routing. If there is already a registered domain example.com, a subdomain can be blog.example.com. Through Let’s Encrypt it is possible to request wildcard certificates (*.example.com, example.com) for a domain and all of its subdomains at once. Instead path based routing examples are of the type https://example.com/app1, https://example.com/app2 and so on. For such types, the certificate must be requested only for the domain and all of its subsequent paths will be covered by the certificate. In other words, path based routing is a server side feature and has nothing to do with an SSL certificate. It is the reverse proxy’s job to handle path based routing. Personally I find path based routing apt for our use case, because of the ease of central SSL certificate management. Secondly I feel the user experience is better because of the readability of these URLs.
There are many open source tools, like certbot, acme.sh, to help with the certificate acquisition & renewal process. The same folks who developed nginx-proxy, also came up with acme-companion which is a lightweight docker container that performs the certificate acquisition & renewal, and is also pretty easy to get it working with the nginx-proxy container.
Acme companion
A lightweight docker container, when coupled with the nginx-proxy container provides the bare minimum setup required for hosting SSL secured services behind a reverse proxy. This container automates the SSL certificate acquisition & renewal using the acme.sh, which is a bash script that interacts with Let’s Encrypt’s servers (and other CAs too) via the ACME protocol. The container must solve one of these challenges which are a part of the ACME protocol and are used by various CAs, including Let’s Encrypt, to validate domain ownership.
Let’s find out how we can use acme-companion to acquire & renew certificates for a single domain in a path based routing setup.
acme-companion as a deployed service
Same old recipe to build a service out of a container. We will use a compose file and register it with docker swarm that will take care of replication and restarting the service in case of failures.
acme-companion: image: nginxproxy/acme-companion:2.4 restart: always volumes:   - /var/run/docker.sock:/var/run/docker.sock:ro   - certs:/etc/nginx/certs   - html:/usr/share/nginx/html   - vhost.d:/etc/nginx/vhost.d   - acme:/etc/acme.sh networks:   - ${NGINX_NETWORK_NAME} environment:   - DEFAULT_EMAIL=${ACME_DEFAULT_EMAIL}   - ACME_CA_URI=${ACME_CA_URI} depends_on:   - ${NGINX_SERVICE_NAME}

volumes: certs: vhost.d: html: acme:
After deploying the above container together with the nginx-proxy container the basic setup to host an application that is SSL secured is complete. The missing piece of the puzzle is the application container that should be hosted on a domain URL and requesting a certificate for this domain URL. So, to request a certificate for an application, say app1, accessible on the domain https://example.com/app1, the compose file for the application must contain two necessary environment variables i.e. VIRTUAL_HOST=example.com & LETSENCRYPT_HOST=example.com. More on this in subsequent articles later on when we will discuss deployment of Portainer application. Also, if you want to request an SSL certificate for multiple applications, (https://example.com/app1, https://example.com/app2, https://example.com/app3) it is simply enough to include the two required environment variables in only one of the three compose files because all three applications share a common domain.
RemarkPossible errors & tips for debugging
Acme companion container needs to request and refresh certificates from an external API, which in our case is Let’s Encrypt’s API. This means both ingress & egress traffic should be enabled on the VM. Hence make sure that firewall rules are accordingly updated. The list of allowed IP addresses should contain 0.0.0.0/0 for this operation. This renewal operation happens every 1 or 3 months. The firewall rules can be updated again. Also make sure that port 80 is open, as it is the default port that is used for completion of HTTPS-01 challenge.
Environment VariablesAdditional environment variables required for acme-companion, apart from the environment variables mentioned above are the following two:
- $DEFAULT_EMAIL : an email address to receive Let’s Encrypt notifications about expiring certificates
- $ACME_CA_URI : variable that points to the Let’s Encrypt API endpoint. The endpoints are available in the let’s encrypt documentation. For testing purposes it is better to use their staging endpoint.
Wrapping up: What’s Next?
After deploying the above container together with the nginx-proxy container the basic setup to host an application that is SSL secured is complete. However the missing piece of the puzzle is the application container - the actual service or the app that should be accessible via a domain URL. Additionally, we need to ensure that the SSL certificate is properly requested and linked to this domain to complete the secure hosting process.
In the next article, we will dive into deploying the application container, linking it with the reverse proxy, and automating SSL certificate management to ensure smooth and hassle-free renewals. To make things practical, we’ll take the example of Portainer, a powerful container management tool.
Stay tuned! 🚀